Sharpen images in photoshop
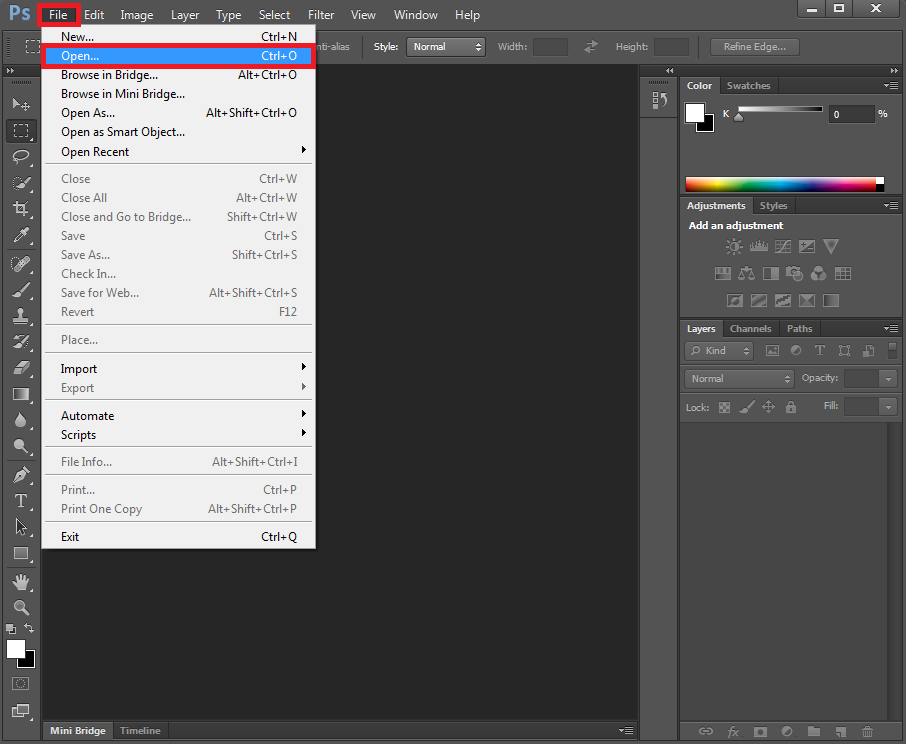
Images may be blurry and simply not sharp enough. In the following tutorial, we gladly help you to sharpen images in Photoshop. We present the four main methods to sharpen images: the simple sharpening tool, the high pass filter tool, the unsharp mask tool and the selective sharpening method. Check it out! To sharpen images in Photoshop, start by opening Photoshop. Click ‘File’ and then ‘Open’ to browse your computer to get the image that you want to sharpen into Photoshop (or browse your computer or external drive to find that image, right-click the image and select ‘Open With’ Photoshop).

Method 1: Simple Sharpen Option
This first option is the easiest option to sharpen images in Photoshop, but it does not give you any control and it almost always falls short. We thus don’t recommend this first method. If you want to use the simple sharpen option, click ‘Filter’, click ‘Sharpen’ and then click ‘Sharpen’.

Method 2: Use High Pass Filter
The High Pass Filter is a great tool to sharpen images, but you must be careful. It might not always look good when printing. If you don’t have to print, it might be a very interesting sharpening option though. To sharpen images with the High Pass Filter, duplicate your layer by right-clicking the layer and selecting ‘Duplicate Layer’.

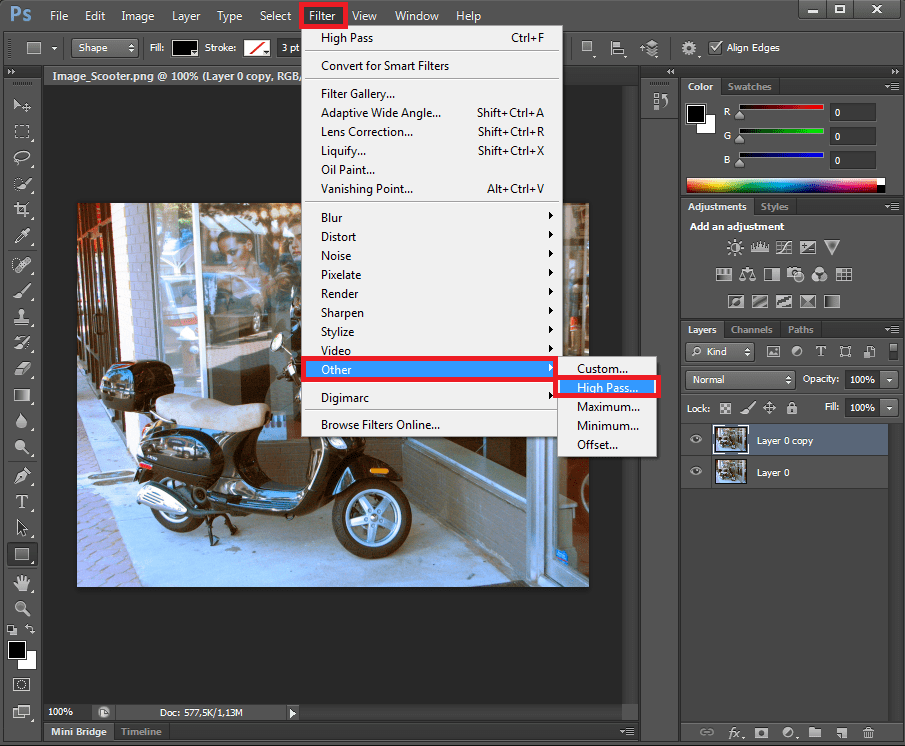
Click ‘Filter’, click ‘Other’ and then click ‘High pass’.

The High Pass Filter scans your image for sharp changes and other information, which normally indicates an edge or a line. It retains those pixels while supressing the rest of the image. Adjust the treshold to find a nice result that contains the edges of your image without an excessive amount of noise. Apply the High Pass Filter by clicking ‘OK’.

You can now merge the new lines with the original image, by clicking ‘Normal’ and by using either the overlay, soft light or hard light option. This will eliminate some of the blur.

Make the last adjustments using the ‘Opacity’ slider until you have an image that is sharper but not unrealistic, as in the following result.

Method 3: Use Unsharp Mask Tool
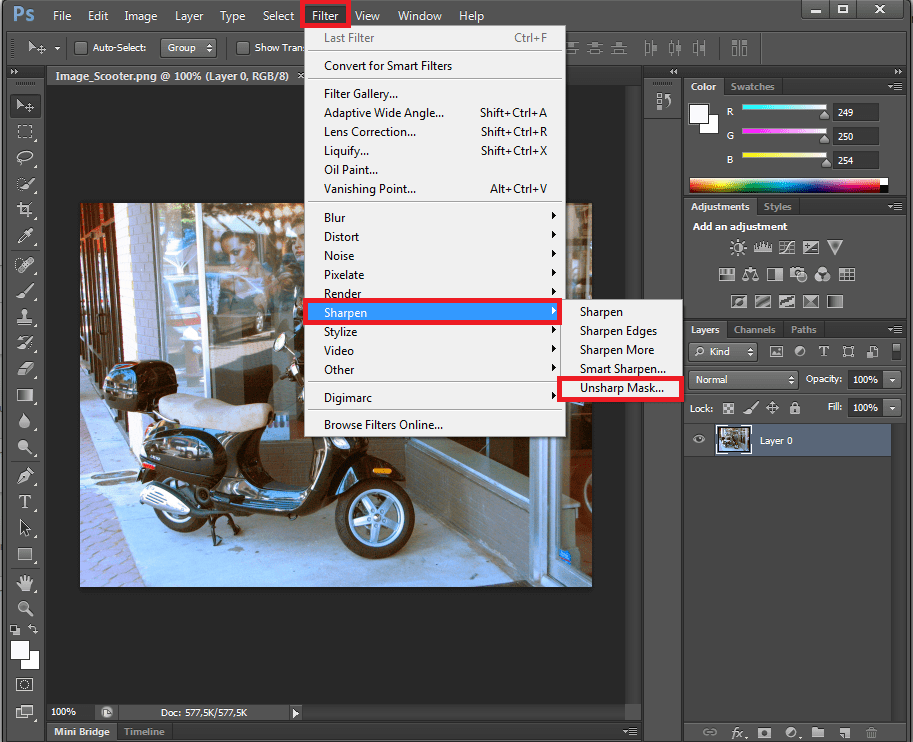
The ‘Unsharp Mask’ tool is a great tool to sharpen an image. To sharpen your image using ‘Unsharp Mask’, start by clicking ‘Filter’. Then click ‘Sharpen’ and click ‘Unsharp Mask’.

In the box that opens, you can adjust the sliders. Play around with ‘Amount’, keep ‘Radius’ rather small and ‘Treshold’ 0. If ‘Preview’ is selected, you can already see how much sharper the image becomes. If you are happy with your changes, click ‘OK’.

As you can see, your image is now a lot sharper. Sometimes, this sharpening is not enough (this is especially the case when you want to sharpen images of faces where faces are too pixely). Continue and click ‘Add Layer Mask’.

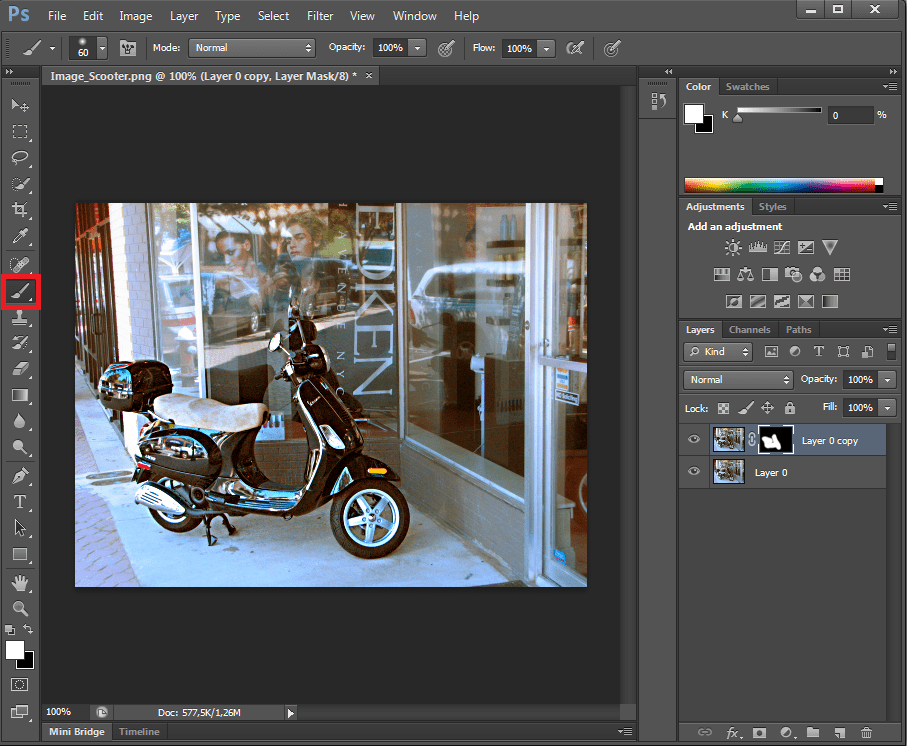
You want to make sure that you have black as your foreground and white as your background. What ‘Layer Mask’ does is, when you paint over in black, it hides all the bad stuff and brings the underneath through. Then you click the ‘Brush’.

You have to make sure that you get a nice soft brush. Play around with the size for different areas of the pictures.

Simply paint over the areas in your picture that you want to sharpen. Don’t worry if you don’t see immediate changes right away, this is perfectly normal. Right-click your Mask Layer and click ‘Disable Mask Layer’ and afterwards right-click it again and click ‘Enable Mask Layer’ to really see the changes in sharpness in your image.

Method 4: Use Selective Sharpening
This final method is really handy and especially interesting if you want to isolate one part of an image and make that part more in focus. To sharpen images with Selective Sharpening, duplicate your layer by right-clicking the layer and selecting ‘Duplicate Layer’.

You start the exact same way as with the ‘Unsharp Mask’ tool. Start by clicking ‘Filter’. Then click ‘Sharpen’ and click ‘Unsharp Mask’.

In the box that opens, you can adjust the sliders. Play around with ‘Amount’, keep ‘Radius’ rather small and ‘Treshold’ 0. If ‘Preview’ is selected, you can already see how much sharper the image becomes. If you are happy with your changes, click ‘OK’. Then click ‘Add Layer Mask’.

Then press ‘Control I’ to invert that layer mask. White means that everything is there, black means that the effect isn’t there.

Now you have to switch ‘Color’ to ‘White’ (0%).

Select the ‘Brush’and paint in ‘White’ where you want the sharpening to apply. As you can see, we have selectively painted the scooter in White so that it becomes a lot sharper. It really stands out now! This is the essence of selective sharpening: you only sharpen the areas that you want. Everything else is left as it was originally.

We hope you now learned a lot about sharpening images in Photoshop!

 Click ‘Filter’, click ‘Other’ and then click ‘High pass’.
  The High Pass Filter scans your image for sharp changes and other information, which normally indicates an edge or a line. It retains those pixels while supressing the rest of the image. Adjust the treshold to find a nice result that contains the edges of your image without an excessive amount of noise. Apply the High Pass Filter by clicking ‘OK’.
  You can now merge the new lines with the original image, by clicking ‘Normal’ and by using either the overlay, soft light or hard light option. This will eliminate some of the blur.
  Make the last adjustments using the ‘Opacity’ slider until you have an image that is sharper but not unrealistic, as in the following result.
 In the box that opens, you can adjust the sliders. Play around with ‘Amount’, keep ‘Radius’ rather small and ‘Treshold’ 0. If ‘Preview’ is selected, you can already see how much sharper the image becomes. If you are happy with your changes, click ‘OK’.
  As you can see, your image is now a lot sharper. Sometimes, this sharpening is not enough (this is especially the case when you want to sharpen images of faces where faces are too pixely). Continue and click ‘Add Layer Mask’.
  You want to make sure that you have black as your foreground and white as your background. What ‘Layer Mask’ does is, when you paint over in black, it hides all the bad stuff and brings the underneath through. Then you click the ‘Brush’.
  You have to make sure that you get a nice soft brush. Play around with the size for different areas of the pictures.
  Simply paint over the areas in your picture that you want to sharpen. Don’t worry if you don’t see immediate changes right away, this is perfectly normal. Right-click your Mask Layer and click ‘Disable Mask Layer’ and afterwards right-click it again and click ‘Enable Mask Layer’ to really see the changes in sharpness in your image.
 You start the exact same way as with the ‘Unsharp Mask’ tool. Start by clicking ‘Filter’. Then click ‘Sharpen’ and click ‘Unsharp Mask’.
  In the box that opens, you can adjust the sliders. Play around with ‘Amount’, keep ‘Radius’ rather small and ‘Treshold’ 0. If ‘Preview’ is selected, you can already see how much sharper the image becomes. If you are happy with your changes, click ‘OK’. Then click ‘Add Layer Mask’.
  Then press ‘Control I’ to invert that layer mask. White means that everything is there, black means that the effect isn’t there.
  Now you have to switch ‘Color’ to ‘White’ (0%).
  Select the ‘Brush’and paint in ‘White’ where you want the sharpening to apply. As you can see, we have selectively painted the scooter in White so that it becomes a lot sharper. It really stands out now! This is the essence of selective sharpening: you only sharpen the areas that you want. Everything else is left as it was originally.
  We hope you now learned a lot about sharpening images in Photoshop!

