Control image sizes in Word
Control image sizes in Word
Word offers the possibility to insert and edit images in your documents. Huge file sizes, however, make documents difficult to share and take in a lot of hard-drive space. Therefore, it is important to control image sizes in Word. If you frequently include pictures or images in Word documents, you thus definitely want to be able to compress pictures so that the file size of documents containing images is limited. Compressing pictures will not give you an absolute controle over the pictures you added to a Word document, but it does help you quite a lot in the important process of limiting file size. In the following tutorial, we help you to control image sizes in Word.
Tutorial
First, click on the picture in your Word document that you want to compress in size. If you want to compress all the pictures in your Word document, it is not necessary to select all the pictures at once nor do you have to repeat the compressing process seperately for each image. In that case, simply click a random picture and continue.
When you have selected a specific or a random picture, a new Picture Tools tab in Word appears: the ‘Format’ tab. Click this ‘Format’ tab.

Next, click ‘Compress Pictures’ to control images sizes in Word.

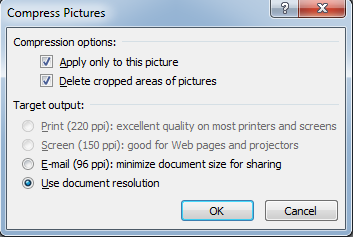
In the ‘Compress Pictures’ menu that opens, you see several options to control image sizes in Word. To apply your compressing changes to only your selected picture or image, leave the first box next to ‘Apply only to this picture’ selected. To apply your changes to all the pictures in your Word document, deselect the box next to ‘Apply only to this picture’. You can choose to compress the selected picture or all the pictures (if you have deselected the first box) in your document to a smaller size. Click ‘OK’ to save the changes that you have made.


