How to crop pictures in Word
Crop pictures in Word
There are a number of ways to format pictures in a Word document. Word offers picture tools to personalize and modify your pictures. Cropping refers to the removal of unwanted areas or irrelevant sections from a picture to improve the overall composition or to accentuate a certain section. It is one of the most basic photo manipulation processes there is and one of the few editing actions that is totally permitted in modern photojournalism, along with colour correction, sharpening and tonal balance. In the following tutorial we show you how you can crop pictures in Word. Don’t know how to insert an image into a Word document? Click here.
Tutorial
Crop a picture in Word
Cropping a picture can be helpful when you want to focus on only a specific part of a picture. First select the image that you want to crop. A new Picture Tools tab in Word appears: the ‘Format’ tab. Click it.

Click ‘Crop’.

Cropping handles will appear around the selected picture. Click, hold and drag the handles to crop pictures in Word. Click ‘Crop’ again and the picture will appear cropped.
Crop a picture to a shape in Word
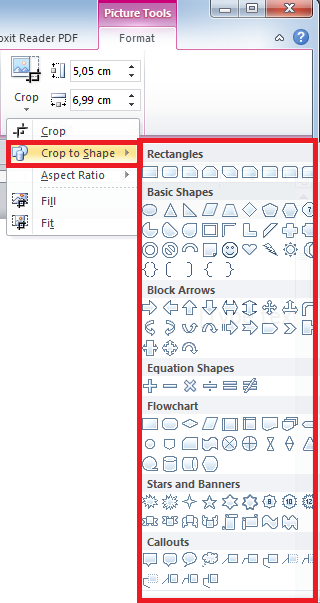
First select the picture that you want to crop. The Picture Tools tab will appear: the ‘Format’ tab. Click ‘Format’. After this, click the arrow under ‘Crop’.

Hover over ‘Crop to Shape’ and select the shape that you want.

The image will appear in the shape that you have chosen.

